Installing anvi'o on Mac OSX
Table of Contents
- (1) Things you need before you start
- (2) Set up conda
- (3) Setup an anvi’o environment
- (4) Install anvi’o
- (5) Common problems
- (6) Check your installation
- (6.1) Setup key resources
- (6.2) Install an automated binning algorithm in your anvi’o environment
- (6.3) Troubleshooting
- I see a lot of warning messages
- Tests fail with an error related to libcrypto
- My browser didn’t show up
- Browser shows up, but anvi’o complains about Chrome
- Everything is fine, but I can’t find anvi’o commands in a new terminal
- When I run anvi’o test for pangenomics, I get errors related to the functional enrichment step
- Other installation options
The latest version of anvi’o is v9. See the release notes.
This page describes the anvi’o installation process for the current stable release on Mac OSX.
(1) Things you need before you start
You will need to run the installation commands from a terminal. Mac OSX comes with a basic Terminal application, or you can download and use a fancier one (such as iTerm).
Some of the packages we use need compiling during the installation process, so you should also make sure that you have Xcode Command Line Tools installed and up-to-date. Here is a quick link to their installation instructions. If you have to re-install the Command Line Tools, please remember to close your terminal window and open a new one before continuing with the anvi’o installation (a big thank you to Hilary Morrison for that tip).
You also need miniconda to be installed on your system. If you don’t already have it, please follow their installation instructions.
If you open a terminal, run the following command, and see the version number there rather than an error, you are golden:
conda --version
conda 25.11.1
(2) Set up conda
It is a good idea to make sure you are not already in a conda environment before you run the following steps. If you are not sure what this means, please simply run the following commands now, one after another to make sure you are not in any conda environment, and there is no such conda environment called anvio-9:
conda deactivate
conda remove -n anvio-9 --all -y
Now. Depending on your architecture, we will setup your conda environment slightly differently. To determine which instructions to follow, please first run the following command in your terminal:
sysctl -n machdep.cpu.brand_string
If the output of this command starts with Apple M, jump to the Apple Silicon section. If it starts with Intel, jump to the Intel section.
Apple Silicon
Now, please look at the output of this command, and act accordingly:
uname -m
-
If it says
x86_64, run the following command to create your conda environment:CONDA_SUBDIR=osx-64 conda create -y --name anvio-9 python=3.10And jump to the rest of the setup:
-
If it says
arm64, then we first must set your terminal application to use Rosetta:- Follow the path for Finder → Applications → iTerm2.app (if you are using iTerm2), or Finder → Applications → Utilities → Terminal.app (if you are using the default Terminal app),
- Right click on the application icon, and click on ‘Get Info’ in the menu,
- Click on “Open using Rosetta” checkbox so it looks like this:
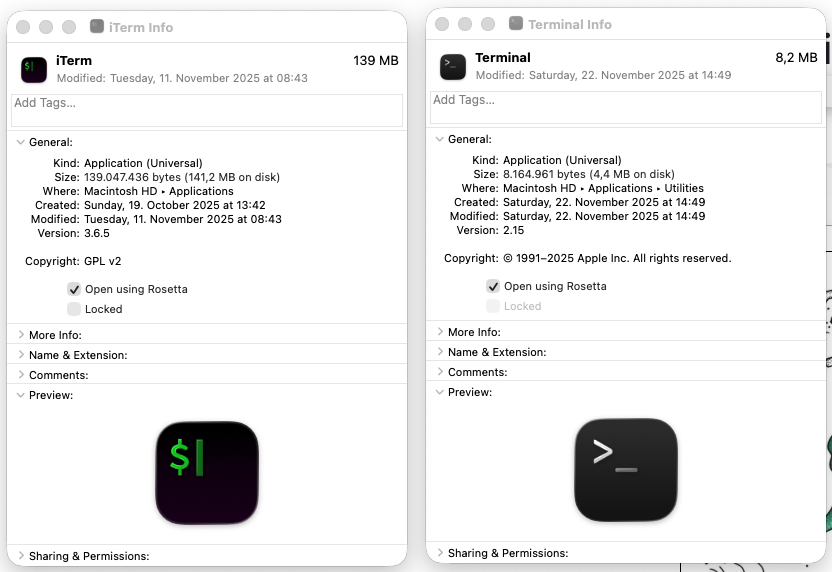
- Restart your terminal application
-
Make sure you see
x86_64when you run the following command:uname -m -
Run this to create your conda environment:
CONDA_SUBDIR=osx-64 conda create -y --name anvio-9 python=3.10 - And jump to the rest of the setup.
Intel
Life is simpler for you. Run this command instead:
conda create -y --name anvio-9 python=3.10
The rest of the conda setup
Next, we will activate the new anvio-9 environment:
conda activate anvio-9
(3) Setup an anvi’o environment
Now you are in a pristine environment, in which you will install all conda packages that anvi’o will need to work properly. This looks scary, but it will work if you just copy-paste it and press ENTER:
conda install -y -c conda-forge -c bioconda python=3.10 \
        sqlite=3.46 prodigal idba mcl muscle=3.8.1551 famsa hmmer diamond \
        blast megahit spades bowtie2 bwa graphviz "samtools>=1.9" \
        trimal iqtree trnascan-se fasttree vmatch r-base r-tidyverse \
        r-optparse r-stringi r-magrittr bioconductor-qvalue meme ghostscript \
        nodejs=20.12.2 llvmlite numba

# try this, if it doesn't install, don't worry (it is sad, but OK):
conda install -y -c bioconda fastani
If you see any error messages in the output indicating that a package failed to install, you should check the ‘Common problems’ section below or search for it in the anvi’o issues page (make sure to check the ‘Closed’ issues as well) to see if we already found a solution for the error.
(4) Install anvi’o
Here you will first download the Python source package for the official anvi’o release:
curl -L https://github.com/merenlab/anvio/releases/download/v9/anvio-9.tar.gz \
        --output anvio-9.tar.gz
Some packages may require to be installed with a more up to date C compiler on Mac OSX. Hence, please run the following commands first:
export CC=/usr/bin/clang
export CXX=/usr/bin/clang++
And then install it using pip like a boss:
pip install anvio-9.tar.gz
If you don’t see any error messages, then you are probably golden and can move on to testing your anvi’o setup in the section “Check your installation” :)
If you do see error messages, please know that you are not alone. We are as frustrated as you are. Please take a look at the problems people have reported and try these solutions, which will most likely address your issues. Common issues can be found on this page in the next section.
(5) Common problems
In this section, you will find the solutions to several common installation issues that users have reported. They are in no particular order, so it may help to search for the key words in your error messsage(s).
Can’t find your issue? Have you checked the anvi’o issues page, even the ‘Closed’ issues? If you can’t find a solution to your problem, please feel free to either open a new issue on our Github or send us a message on  .
.
Issues related to PyANI
In anvi’o v8 there is a problem with incompatibility between the default installed versions of PyANI (v0.2.12) and matplotlib (v3.9.x). The program anvi-compute-genome-similarity can fail at the PyANI step, and the resulting log file will show an error like this:
AttributeError: module 'matplotlib.pyplot' has no attribute 'register_cmap'
To fix this issue, you can manually downgrade the matplotlib package like this:
pip install matplotlib==3.5.1
Or you can just switch to using FastANI instead. See this Discord thread for more context and details.
(6) Check your installation
If you are here, you are ready to check if everything is working on your system. This section will help you finalize your installation so you are prepared for anything.
The easiest way to check your installation is to run the anvi’o program anvi-self-test:
anvi-self-test --suite mini
If you don’t want anvi’o to show you a browser window at the end and quietly finish testing if everything is OK, add --no-interactive flag to the command above. Another note, anvi-self-test is run in --suite mini mode, which tests the absolute minimal features of your anvi’o installation. If you run it without any parameters, it will tests many more things.
If everything goes smoothly, your browser should pop-up and show you an anvi’o interactive interface that looks something like this once anvi-self-test is done running:
The screenshot above is from 2015 and will be vastly different from the interactive interface you should see in your browser. It is still here so we remember where we came from 😇
If you are seeing the interactive interface, it means you now have a computer that can run anvi’o! In theory you can leave this page at this moment, but there are a few more details that would be best to attend now. So please bear with this tutorial just a little longer.
Don’t forget to come say hi to us on anvi’o Discord.
(6.1) Setup key resources
This is to further prepare your anvi’o installation for things you may need later, such as databases for taxonomic annotation of your genomes or functional annotation of your genes. This is an up-to-date list of programs that you should run in your terminal to have everything ready:
- Run anvi-setup-scg-taxonomy, to setup SCG taxonomy data using GTDB genomes.
- Run anvi-setup-ncbi-cogs, to setup NCBI’s COG database for quick annotation of genes with functions,
- Run anvi-setup-kegg-data, so anvi-estimate-metabolism and anvi-reaction-network find the database of KEGG orthologs ready when you need it.
- Run anvi-setup-modelseed-database, so that anvi-reaction-network can link enzymes to metabolic compounds with ModelSEED data.
- Optimally you can also run
anvi-self-test --suite pangenomicsto see if everything is order, especially if you plan to use anvi’o for pangenomics.
(6.2) Install an automated binning algorithm in your anvi’o environment
You can skip this section if you are not interested in reconstructing genomes from metagenomes using anvi’o.
Anvi’o offers a powerful interactive environment to reconstruct genomes from metageomes where you have full control over subtle decisions. For small assemblies (i.e., where you have less than 25,000 contigs), you do not need an additional binning software to reconstruct genomes from metagenomes. But for larger metagenomes, you have two options:
- Use the program anvi-cluster-contigs with an automatic binning software that is already installed on your system.
- Perform automatic binning outside of anvi’o, and import the binning results as a collection into anvi’o using the program anvi-import-collection to further refine those results.
The following recipe will help you install CONCOCT on your system just so there is an automatic binning algorithm ready on your system that you can use with anvi-cluster-contigs:
# setup a place to download CONCOCT source code
mkdir -p ~/github/ && cd ~/github/

# get a clone of the CONCOCT codebase from the fork
# that is tailored for the anvi'o conda environment
git clone https://github.com/merenlab/CONCOCT.git

# build and install
cd CONCOCT
python setup.py build
python setup.py install
Please note that you may encounter an error when running CONCOCT due to a TypeError. Please see the report #2154 for more information regarding this issue. IF you run into this issue, you may be able to resolve it by running the following command in your anvi’o conda environment: pip install scikit-learn==1.1.0.  developed and tested this solution, and confirmed that it works at least for
 v8. But please let us know if this fix breaks any other part of anvi’o :)
If everything worked, when you type the following command,
anvi-cluster-contigs -h
You should see this output (where CONCOCT is found):
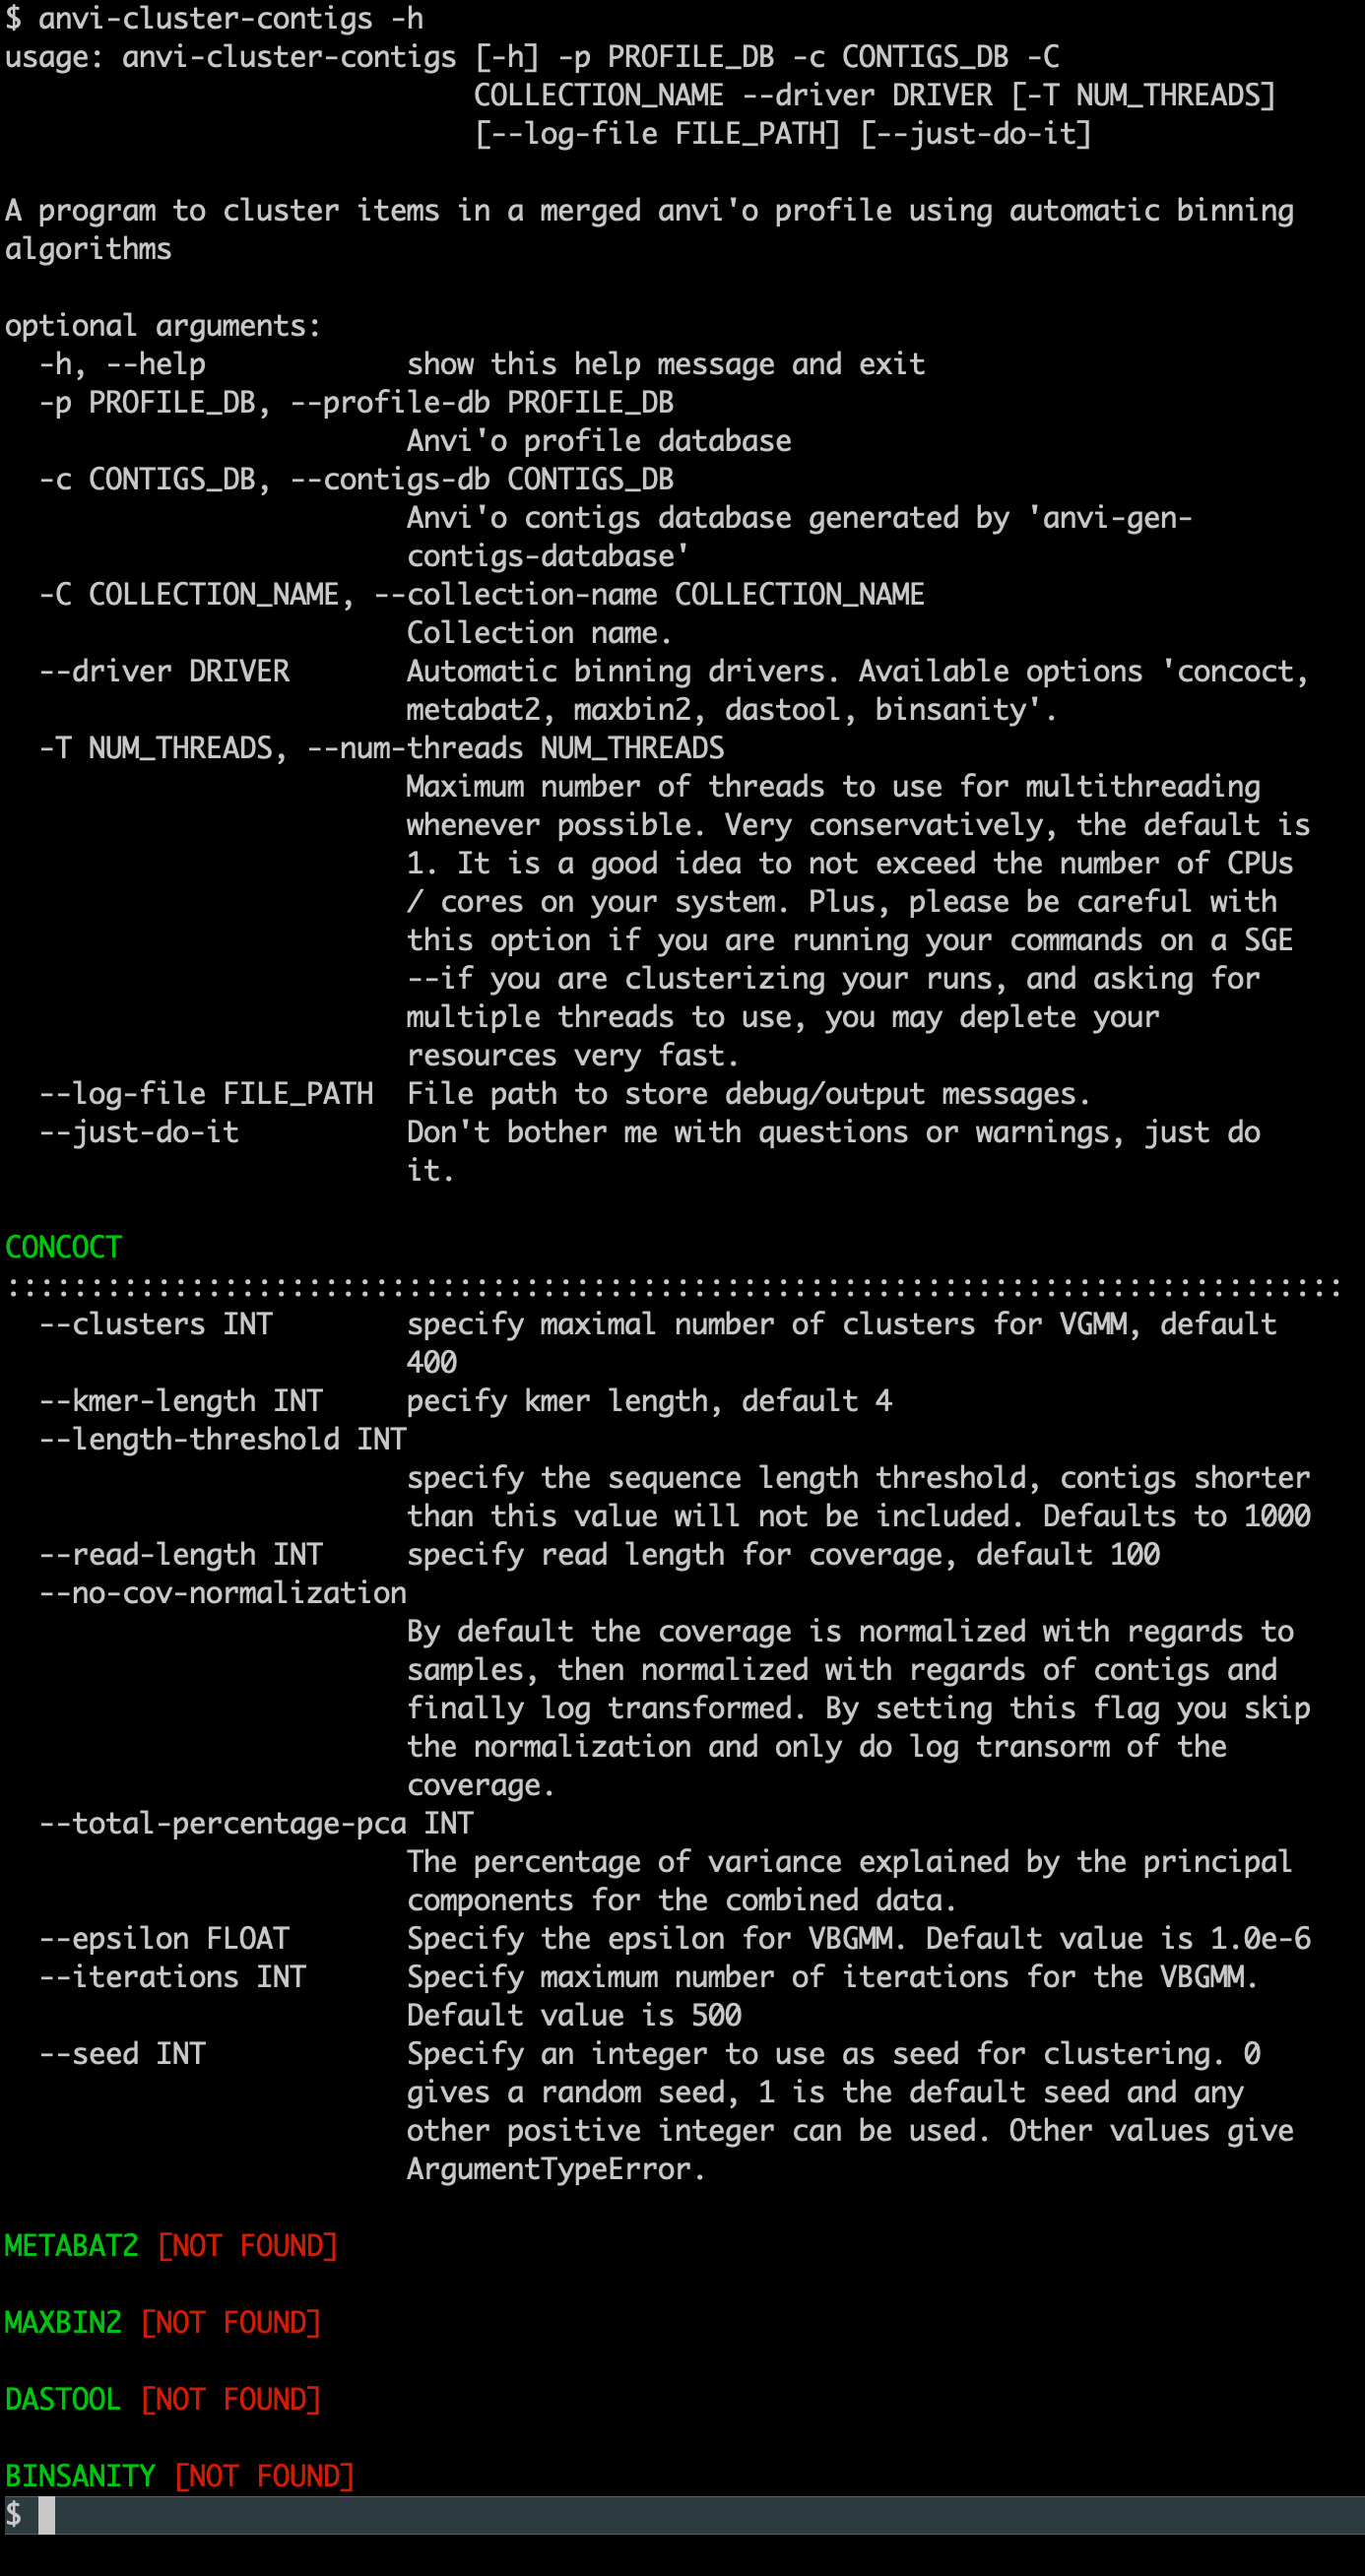
If you are a developer of an automatic binning algorithm and would like to see it in anvi’o, please get in touch with us. Anvi’o can pass any information about sequences (their coverages across samples, tetranucleotide frequencies, genes, functions, and whatever else you would like to have about them) to any program to run it on user data and import the results into anvi’o databases seamlessly through simple Python wrappers. Here are some examples of such wrappers for CONCOCT, for BinSanity, and for MaxBin2. If you wish to create one but are not sure how to test it, please start a GitHub issue.
(6.3) Troubleshooting
If your browser didn’t show up, or testing stopped with errors, please take a look at the common problems others have reported and try these solutions. Please remember you can always come to anvi’o Discord to ask for help if things are not working for you and the answers you find here are no use.
I see a lot of warning messages
It is absolutely normal to see ‘warning’ messages. In general anvi’o is talkative as it would like to keep you informed. In an ideal world you should keep a careful eye on those warning messages, but in most cases they will not require action.
Tests fail with an error related to libcrypto
If anvi-self-test fails with an error message that looks something like this,
libcrypto.so.1.0.0: cannot open shared object file: no such file or directory
it is likely that the pysam module installation failed. To fix this you should revisit the installation instructions, especially the part that says “Issues related to samtools”, and then come back to testing.
My browser didn’t show up
If your browser does not show up, or does show up but can’t show anything due to a ‘network problem’, you may also want to visit the address http://localhost:8080 by manually entering this address to your browser’s address bar, which should work on your local computer. On some systems the default network interface anvi’o uses to connect to its own server causes issues. You may also find the help page for anvi-interactive useful for future references.
If your browser does not show up while you are connected to a remote computer, it is quite normal. In some cases a text-based browser may show up instead of your graphical browser, too. This is becasue you are running anvi’o on another computer, and it tries to open a browser there. You can set things up for anvi’o to use your local browser to access to an anvi’o interactive interactive interface running remotely. For that, you can read this article (or ask your systems administrator to read it) to learn how you can forward displays from servers to your personal computer.
Browser shows up, but anvi’o complains about Chrome
If you are not using Chrome as your default browser, anvi’o will complain about it :/ We hate the idea of asking you to change your browser preferences for anvi’o :( But currently, Chrome maintains the most efficient SVG engine among all browsers we tested as of 2021. For instance, Safari can run the anvi’o interactive interface, however it takes orders of magnitude more time and memory compared to Chrome. Firefox, on the other hand, doesn’t even bother drawing anything at all. Long story short, the anvi’o interactive interface will not perform optimally with anything but Chrome. So you need Chrome. Moreover, if Chrome is not your default browser, every time interactive interface pops up, you will need to copy-paste the address bar into a Chrome window.
You can learn what is your default browser by running this command in your terminal:
python -c 'import webbrowser as w; w.open_new("http://")'
Everything is fine, but I can’t find anvi’o commands in a new terminal
If you open a new terminal and get command not found error when you run anvi’o commands, it means you need to activate anvi’o conda environment by running the following command (assuming that you named your conda environment for anvio as anvio-9, but you can always list your conda environments by running conda env list):
conda activate anvio-9
When I run anvi’o test for pangenomics, I get errors related to the functional enrichment step
If you are getting an error that goes like,
Config Error: Something went wrong during the functional enrichment analysis :( We don't know
              what happened, but this log file could contain some clues: (...)
it often means that the R libraries that are needed to run functional enrichment analyses are not installed properly through conda :/ Luckily, you can try to install them using the R terminal as Marco Gabrielli shared on anvi’o Discord. For this, try running this command in your terminal:
Rscript -e 'install.packages(c("stringi", "tidyverse", "magrittr", "optparse"), repos="https://cloud.r-project.org")'
If everything goes alright, you can quit the R terminal by pressing CTRL+D twice. Once you are out, you can run this command to see if everything runs smoothly:
Rscript -e "library('tidyverse')"
In some cases the problem is the qvalue package, which can be a pain to install. If you are having hard time with that one, you can try this and see if that solves it:
Rscript -e 'install.packages("BiocManager", repos="https://cran.rstudio.com"); BiocManager::install("qvalue")'
Now you can take a look up some anvi’o resources here, or join anvi’o Discord to be a part of our growing community.
Other installation options
You will always find the official archives of anvi’o code as at the bottom of our GitHub releases as anvio-X.tar.gz:
https://github.com/merenlab/anvio/releases/latest
The best way to see what additional software you will need running on your computer for anvi’o to be happy is to take a look at the contents of this conda recipe (which is a conda build recipe, but it will give you the idea (ignore anvio-minimal, you basically have that one taken care of when you have anvi’o installed)).
Don’t be a stranger, and let us know if you need help through
.
If you find a mistake on this page or would you like to update something in it, please feel free to edit its source by clicking the edit button at the top-right corner (which you will see if you are logged in to GitHub) 😇